This the multi-page printable view of this section. Click here to print.
Contribution Guidelines
1 - How to Contribute
Contributing to the Docs
To contribute to the kiali.io docs see kiali.io on github.
In short you will:
- Fork the kiali.io repo on GitHub.
- Make your changes and send a pull request (PR).
- If you’re not yet ready for a review, add “WIP” to the PR name to indicate it’s a work in progress.
- Don’t add the Hugo property “draft = true” to the page front matter, it prevents auto-deployment of the content preview.
- Wait for the automated PR workflow to do some checks. When it’s ready, you should see a comment like this: deploy/netlify — Deploy preview ready!
- Click Details to the right of “Deploy preview ready” to see a preview of your updates.
- Continue updating your doc and pushing your changes until you’re happy with the content.
Updating a single page
If you’ve just spotted something you’d like to change while using the docs, there is a shortcut for you:
- Click Edit this page in the top right hand corner of the page.
- If you don’t already have an up to date fork of the project repo, you are prompted to get one:
- Click Fork this repository and propose changes or Update your Fork to get an up to date version of the project to edit.
- The appropriate page in your fork is displayed in edit mode.
- Follow the steps above to make, preview, and propose your changes.
Creating an issue
If you’ve found a problem in the docs, but you’re not sure how to fix it yourself, please create an issue in the kiali.io repo. You can also create an issue about a specific page by clicking the Create Documentation Issue button in the top right hand corner of the page.
Contributing to the Code
For code contribution see the kiali project’s CONTRIBUTING page.
2 - Development Environment
Introduction
In this section it is explained how to set up a development environment:
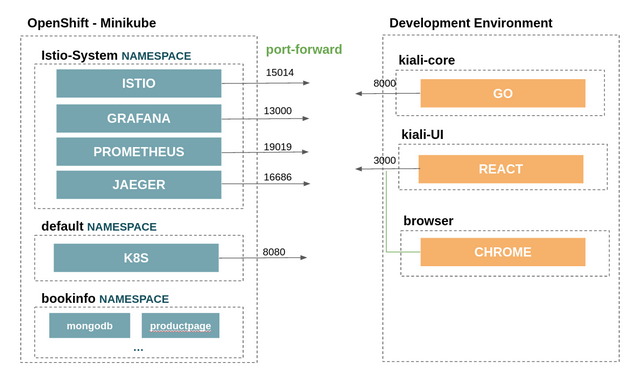
- As described in Architecture, we would need to have the Kiali dependencies running in an OpenShift or Kubernetes
- We will use a port forward to access those services outside the cluster.
- We will have the project source running locally. In this case we will set up an IDE.
- Bookinfo application example will also be running on our cluster.

Prerrequisites
- Development tools are installed:
- Kiali source code: We will fork the 3 kiali repositories, and then, clone them in a local folder:
- Istio and the required services are running in Minikube or OpenShift. To install it following the above schema, it is possible to use the following scripts (From the Kiali repository):
hack/istio/install-istio-via-istioctl.sh: Installs the latest Istio release into istio-system namespace along with the Prometheus, Grafana, and Jaeger addons.hack/istio/install-bookinfo-demo.sh: Installs the Bookinfo demo that is found in the Istio release that was installed via the hack/istio/install-istio-via-istioctl.sh hack script.- Pass in
-tgto also install a traffic generator that will send messages periodically into the Bookinfo demo. - If using Minikube and the
-tgoption, make sure you pass in the Minikube profile name via-mpif the profile name is notminikube.
- Pass in
Port forward
Before the setup, we will need to do a port-forward of the services that kiali is using.
We can use the hack/run-kiali.sh script for this purpose. It can work without any options. Pass –help to see the options it takes.
An example to run it following the above schema:
./run-kiali.sh -pg 13000:3000 -pp 19090:9090 -app 8080 -es false -iu http://127.0.0.1:15014
Local Configuration File
The go process will require a configuration to point to these services and other specific configurations. This file will be places in ~/kiali/config.yaml, and referenced later by the GO local process.
api:
  namespaces:
    exclude:
      - istio-operator
      - kube.*
      - openshift.*
      - ibm.*
      - kiali-operator
    label_selector: ""
server:
  address: localhost
  port: 8000
  static_content_root_directory: /home/userTests/kiali-static-files
in_cluster: false
deployment:
  accessible_namespaces: [ "**" ]
extensions:
  iter_8:
    enabled: true
external_services:
  istio:
    istio_canary_revision:
      current: prod
      upgrade: canary
    url_service_version: http://localhost:15014/version
    config_map_name: istio
    istio_identity_domain: svc.cluster.local
  prometheus:
    url: http://localhost:19090
    cache_enabled: true
  tracing:
    enabled: true
    in_cluster_url: http://localhost:16685/jaeger
    url: http://localhost:16686/jaeger
    use_grpc: false
    whitelist_istio_system:
    - jaeger-query
    - istio-ingressgateway
    namespace: istio-system
    port: 443
    service: tracing
    auth:
      insecure_skip_verify: false
      password: cTSM/77tNZ0yGw/ZJXkO7IObbemLJjFkCp4GuqLzXIgE8RWrJvWjFViv9Dpu0SguxD3N/oCUPJnyreoHuSCNZ9kFTrHgRl033waUpTAYZPCEzMPw9Rui5C3/o5x4bclHq0IQ8OGr5LuN2L1WCXrEo9iUntPMovbsP1Alqwh0LZ79ztIkObNBNniX1tuo0fM9O53QKSAjGBnK13LFjHC7wXo+mWw1fzHf9x4jib6UDbeuzHfugDS0Mtj4E9QDRHjpPUrh66dVib4kCJ4nMO19BuiIk+OgbNdhBhg3wn1fn7F6+d/i6Mbq/C/OJylSL6ewUVwIvIAmcRM/jdTqdz0w
      type: basic
      use_kiali_token: false
      username: internal
  grafana:
    in_cluster_url: http://localhost:13000
    url: http://localhost:13000
    dashboards:
      - name: "Istio Service Dashboard"
        variables:
          namespace: "var-namespace"
          service: "var-service"
      - name: "Istio Workload Dashboard"
        variables:
          namespace: "var-namespace"
          workload: "var-workload"
  custom_dashboards:
    enabled: false
#health_config:
#  rate:
#    - namespace: "alpha"
#      tolerance:
#        - code: "4XX"
#          degraded: 30
#          failure: 50
#          protocol: "http"
#        - code: "5XX"
#          degraded: 30
#          failure: 50
#          protocol: "http"
#    - namespace: "beta"
#      tolerance:
#        - code: "[4]\\d\\d"
#          degraded: 30
#          failure: 40
#          protocol: "http"
#        - code: "[5]\\d\\d"
#          protocol: "http"
auth:
  strategy: anonymous
login_token:
  signing_key: test
kubernetes_config:
  cache_enabled: true
  cache_duration: 300
  cache_namespaces:
    - bookinfo
    - istio-system
  cache_token_namespace_duration: 120
  excluded_workloads: []
kiali_feature_flags:
  istio_injection_action: true
  istio_upgrade_action: false
istio_labels:
  app_label_name: app
  injection_label_name: istio-injection
  injection_label_rev: istio.io/rev
  version_label_name: version
Local Processes
In this section we will start the 3 local processes for kiali:
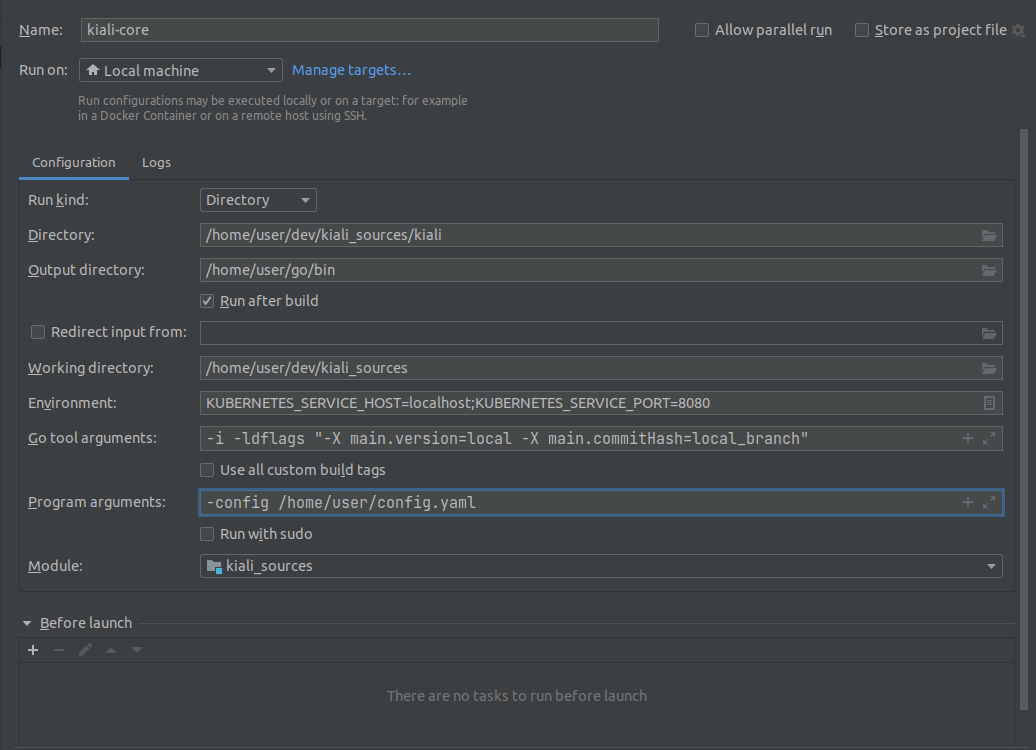
- kiali-core: The backend Go process
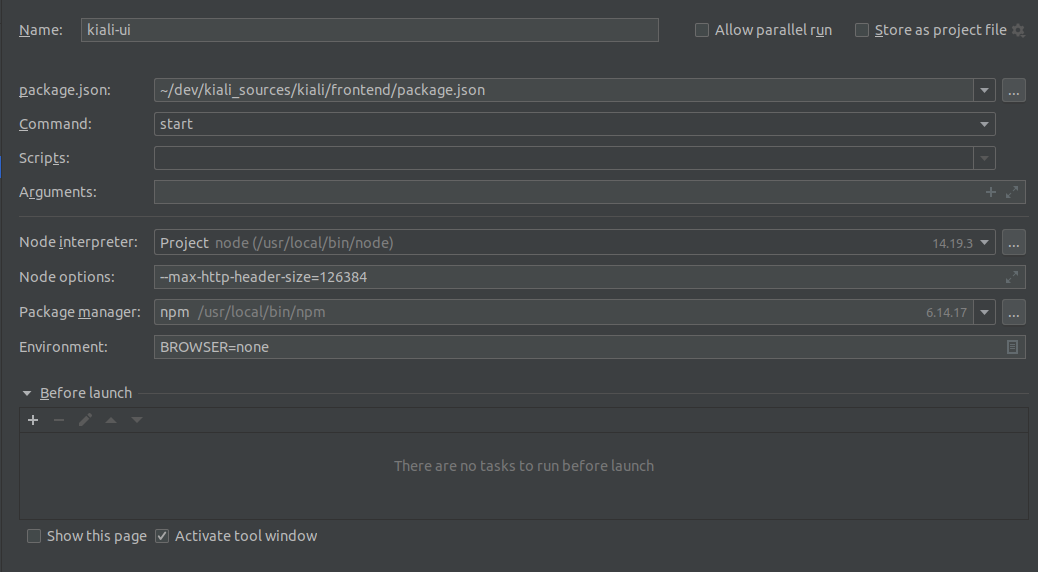
- kiali-ui: The frontend React process
- browser: The Javascript debugger process.
In this example, we will create the configurations in the Jetbrains Golang IDE.
kiali-core
To run the Kiali backend.

kiali-ui
In order to forward the requests to the backend propertly, we will need to add the following line in kiali/frontend/package.json:
"proxy": "http://localhost:8000",

browser
This process is required to debug the frontend.

After running the 3 processes, we should be able to access Kiali GUI in localhost:3000
Using VisualStudio Code
To run kiali in a debugger, a file “launch.json” should be created in your local kiali local repo’s .vscode directory (e.g. home/source/kiali/kiali/.vscode/launch.json). The file should look like:
{
  "version": "0.2.0",
  "configurations": [
    {
      "name": "Launch Kiali to use hack script services",
      "type": "go",
      "request": "launch",
      "mode": "debug",
      "program": "${workspaceRoot}/kiali.go",
      "cwd": "${env:HOME}/tmp/run-kiali",
      "args": ["-config", "${env:HOME}/tmp/run-kiali/run-kiali-config.yaml"],
      "env": {
        "KUBERNETES_SERVICE_HOST": "127.0.0.1",
        "KUBERNETES_SERVICE_PORT": "8001",
        "LOG_LEVEL": "trace"
      }
    }
  ]
}
run-kiali.sh should be started like this:
hack/run-kiali.sh --tmp-root-dir $HOME/tmp --enable-server false